# Robotics Vocabulary
Most of Beam Bots' documentation assumes you know what a link, a joint or an estimator is, and spends its time explaining how BB models them. This page goes the other way. It's for Elixir developers who can write a supervision tree in their sleep but have never had to describe a physical machine before.
You don't need any maths for this. The aim is that by the end, every word in the DSL reference means something to you.
Coming the other way — a roboticist who's new to Elixir and the BEAM — is [Elixir for Roboticists](elixir-for-roboticists.md).
## A robot is a supervision tree
Start here, because it makes the rest of the page much easier to read.
A BB robot is a module that does `use BB`, and what you write inside it is not a config file that something parses later. It compiles. The physical structure becomes a struct you can do geometry against, and everything that senses, moves or decides becomes a process under a supervisor shaped like the machine.
That has two consequences worth holding onto:
- **Failure is local.** A sensor that crashes gets restarted, and the rest of the robot carries on. You already know how this works — it's the same tree you'd write by hand, just derived from a description of the hardware.
- **The hardware is optional.** You can boot the whole thing on your laptop with nothing plugged in. It's a real robot; it simply has nothing to sense and nothing to move. That's what makes most of the tutorials runnable at a desk.
Everything below is both a block in the DSL and, at runtime, a process.
The vocabulary splits four ways: the **shape**, the **senses**, the **doing**, and the **rules**.
## The shape: links and joints
### Links
A **link** is a rigid chunk of robot. The body, a wheel, a bracket, a camera housing — anything you'd treat as one lump that doesn't flex. Links are where you record mass, appearance and collision shape:
```elixir
link :base_link do
visual do
box(x: ~u(100 millimeter), y: ~u(100 millimeter), z: ~u(50 millimeter))
end
inertial do
mass(~u(500 gram))
end
end
```
`visual` and `collision` are separate on purpose. The pretty shape and the cheap-to-compute shape are usually not the same thing, so a link might have a detailed mesh to look at and a plain box to bump into.
`inertial` is the one people skip, and it's the one that turns a drawing into something you can do physics against. If you only ever want to know where things are, you can leave it out. If anything is going to balance, swing or tip, you can't.
### Units are not optional
Notice that every number above carries a unit, via the `~u` sigil that `use BB` brings in. That isn't decoration. There's no default unit and no bare-number shorthand, because `20.7` is a very different robot depending on whether you meant millimetres or metres. Declare it and the framework converts to SI for you.
### Joints
A **joint** is how one link is allowed to move relative to another. Joints nest inside the parent link, and the child link nests inside the joint — that nesting *is* the kinematic chain:
```elixir
link :base_link do
joint :pan_joint do
type(:revolute)
link :pan_link do
end
end
end
```
There are six types.
#### Rotation, with and without stops
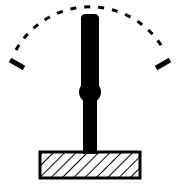
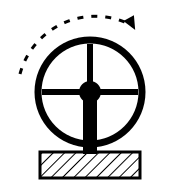 `:revolute` and `:continuous` both rotate about a single axis. The difference is whether there are limits.
A `:revolute` joint stops: an elbow, a servo horn, a hinged lid. It declares how far it may travel and BB holds you to that. A `:continuous` joint doesn't — which is what you want for a wheel.
Because a continuous joint has no limits to violate, BB won't insist you sense where it is. That's not the same as saying you can't: a magnetic encoder will happily report a wheel's angle, and that's where odometry comes from.
#### Sliding, and not moving at all
`:revolute` and `:continuous` both rotate about a single axis. The difference is whether there are limits.
A `:revolute` joint stops: an elbow, a servo horn, a hinged lid. It declares how far it may travel and BB holds you to that. A `:continuous` joint doesn't — which is what you want for a wheel.
Because a continuous joint has no limits to violate, BB won't insist you sense where it is. That's not the same as saying you can't: a magnetic encoder will happily report a wheel's angle, and that's where odometry comes from.
#### Sliding, and not moving at all
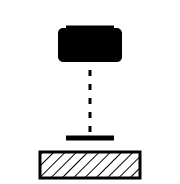
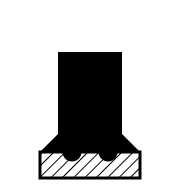 `:prismatic` is the straight-line version of revolute — it slides along one axis between two stops. A drawer, a linear actuator, a print head.
`:fixed` doesn't move at all, which raises the obvious question of why it exists.
Because a joint is how you say *where something is*. If your motion sensor is soldered to a board halfway up the body, standing upright and facing forwards, then its position and orientation relative to the rest of the robot is exactly what a fixed joint records. Write it down once and you never do that trigonometry again — every reading that sensor produces can be transformed into any other frame automatically. It's common to use two or three fixed joints just to mount one part.
#### More than one freedom at a time
`:prismatic` is the straight-line version of revolute — it slides along one axis between two stops. A drawer, a linear actuator, a print head.
`:fixed` doesn't move at all, which raises the obvious question of why it exists.
Because a joint is how you say *where something is*. If your motion sensor is soldered to a board halfway up the body, standing upright and facing forwards, then its position and orientation relative to the rest of the robot is exactly what a fixed joint records. Write it down once and you never do that trigonometry again — every reading that sensor produces can be transformed into any other frame automatically. It's common to use two or three fixed joints just to mount one part.
#### More than one freedom at a time
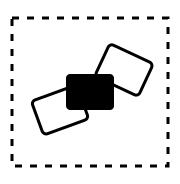
 `:planar` has three freedoms: slide one way, slide the other, and turn about the plane's normal. That's a wheeled robot on a floor, which is why this diagram is drawn from above — you can't show two directions of travel from the side.
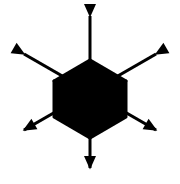
`:floating` has all six: three translations, three rotations, nothing held. Note the absence of any ground or mounting in that picture; that's the whole idea. It's what you'd use for a drone.
These two are also the only types where `axis` means something other than "the thing it moves along". For planar it's the surface normal of the plane, which is why it's required there. Floating has no distinguished direction at all, so supplying an axis is an error. The [DSL reference](../dsls/DSL-BB.md) has the details.
### Joints nothing drives
Here's the idea that catches most people out, and the one place on this page where a pan-tilt arm can't illustrate the point — so this example is from a two-wheeled balancing robot instead.
Look at the top of its topology and the first link isn't part of the robot at all:
```elixir
link :world do
joint :ground do
type(:planar)
link :ground_contact do
joint :lean do
type(:revolute)
link :base_link do
# ... the actual robot
end
end
end
end
end
```
Which seems odd until you ask what the robot is attached to. Nothing. It's free to move about the floor and free to tip over, and those are real degrees of freedom. The honest way to describe them is as joints between the world and the robot: `:ground` carries where it is on the floor, `:lean` carries how far it's tipped.
And nothing drives either of them. There's no actuator on `:ground` or `:lean`. They aren't things you command, they're things that happen to you, and sensors are how you find out how much.
So the topology describes a whole kinematic system, not just the parts you bolted together. An arm bolted to a bench genuinely does start at its base. A robot that can fall over doesn't, and pretending otherwise means doing the correction by hand forever.
### Kinematics
**Kinematics** is the business of working out where everything is. Given the chain of links and joints, plus how far each joint has currently moved, BB can tell you where any part of the machine is relative to any other.
That's more useful than it sounds. When a motion sensor mounted sideways halfway up the body reports "twelve degrees", that's twelve degrees in the *sensor's* frame. Kinematics is what turns it into a statement about the robot without you writing any trigonometry — which is the payoff for having described all those fixed joints in the first place.
Going the other way — "what joint angles put the gripper *there*?" — is **inverse kinematics**, and it's a harder problem with several competing solvers.
- [Forward Kinematics](../tutorials/04-kinematics.md) for computing positions
- [Inverse Kinematics](../tutorials/09-inverse-kinematics.md) for the reverse
## The senses: sensors and estimators
### Sensors
A **sensor** reads some hardware and publishes what it measured. It hangs off a link, because where a sensor sits changes what it sees — a sensor on a wheel and a sensor on the body are measuring different things.
```elixir
sensor :imu, {BB.Sensor.BMI323, bus: "i2c-0", address: 0x68}
```
Nothing ever asks a sensor for a reading. It publishes continuously and anything that cares subscribes. If you're used to `GenServer.call/3` being the default, this is the adjustment: the data flow is broadcast, not request-response.
### Estimators
An **estimator** turns measurements into the thing you actually wanted.
This is the one newcomers don't expect, so it's worth a concrete example. An IMU gives you two things: linear acceleration, and rotation rate. Neither of those is "which way up am I", and that's usually the question you have.
- The **accelerometer** feels gravity, so in principle it knows where down is. But it feels every other acceleration too and cannot tell them apart. A robot leaning over and a robot speeding up look identical to it.
- The **gyroscope** measures how fast you're turning. Add that up over time and you get an angle — fast, smooth, and completely untroubled by acceleration. But every small error in the measurement gets added up as well, so it drifts. A part spec'd at 1°/s of zero-rate offset is 60 degrees adrift after a minute of sitting perfectly still.
One sensor that's right on average but lies exactly when you're moving, and one that's beautifully responsive and slowly becomes fiction. The fix is to use both: follow the gyroscope moment to moment, and lean gently on the accelerometer over seconds to drag the estimate back towards where gravity says down really is.
That's all an AHRS filter is — Attitude and Heading Reference System, a grand name for "which way up am I". You don't have to write one; [`bb_estimator_ahrs`](https://hexdocs.pm/bb_estimator_ahrs) ships the standard ones.
```elixir
sensor :imu, {BB.Sensor.BMI323, bus: "i2c-0", address: 0x68} do
estimator :orientation, {BB.Estimator.Ahrs.Mahony, kp: 0.4, ki: 0.001}
end
```
The estimator nests *inside* the sensor here because "which way up" is that sensor's own answer rather than a fact about the robot. Estimators can also hang off a link, for when they're fusing several sensors into something that belongs to the robot as a whole.
- [Understanding Estimators](understanding-estimators.md) for the design, the two DSL forms, and estimator health
- [State Estimation](../tutorials/13-state-estimation.md) for writing one
## The doing: actuators and controllers
### Actuators
An **actuator** is the other half of a joint. The joint says this wheel is allowed to spin; the actuator is the thing that spins it. It takes commands and drives hardware.
```elixir
joint :pan_joint do
type(:revolute)
actuator :pan_servo, {MyRobot.Servo, channel: 0}
end
```
Which means a joint with no actuator is still a perfectly good joint. It just moves because the world moved it, rather than because you asked — exactly the `:ground` and `:lean` joints from earlier.
### Controllers
A **controller** subscribes to whatever it needs, does its sums, and tells actuators what to do. Long-lived, supervised, and running for as long as the robot does. This is where your loop lives.
```elixir
controller :tracker, {MyRobot.FaceTracker, rate: 50}
```
A controller that needs to run periodically embeds a `BB.Loop` in its state, which handles the non-drifting tick, the measured time delta and the "this loop isn't keeping up" reporting. It's a struct rather than a behaviour or a process, so your controller stays an ordinary controller and threads the loop through its own callbacks. A loop can also be clocked externally, which is usually the better choice for a feedback loop — the sensor feeding it already has a cadence, and borrowing that beats running an independent timer alongside it.
The classic controller is a feedback loop: you know what you want, you can measure what you've got, and the difference between them is the **error**. What you do with that error is the interesting part, and the standard answer is PID — proportional, integral, derivative.
- [Understanding PID](https://hexdocs.pm/bb_pid_controller/understanding-pid.html) explains the three terms from scratch, and how to tell by watching a robot which one needs changing
- [Reactive Controllers](reactive-controllers.md) for the built-in threshold and pattern-match controllers
- [Writing an Actuator](../tutorials/12-writing-an-actuator.md) for the actuator side
## The rules: commands, states and parameters
### Commands
A **command** is something you're allowed to ask the robot to do. Unlike a controller it's short-lived: it has a goal, it runs, it produces a result, and it finishes.
```elixir
command :home do
handler(MyRobot.Command.Home)
allowed_states([:idle])
end
```
### States
A **state** is where the robot is in its own life, and which commands are legal there. Every robot starts with `:disarmed` and `:idle`; you add whatever else your machine needs.
```elixir
state(:tracking, doc: "Following a target")
```
This is the safety system, and the reason it's worth declaring rather than checking by hand: a robot that has fallen over shouldn't accept "drive forwards", and a state machine lets you say so once instead of guarding every call site.
- [Commands and State Machine](../tutorials/05-commands.md)
- [Understanding Safety](understanding-safety.md)
### Parameters
A **parameter** is a configuration value with a type, a default, and optionally bounds. Groups nest them, and the nesting gives each one a path.
```elixir
parameters do
group :tracking do
param(:max_speed, type: :float, default: 30.0, min: 0.0, max: 90.0)
end
end
```
Every write is checked, so nothing can set that to `"banana"` or to minus four hundred.
Declaring it is half the story. The other half is that you can change it on a running robot:
```elixir
iex> BB.Parameter.get!(MyRobot.Robot, [:tracking, :max_speed])
30.0
iex> BB.Parameter.set(MyRobot.Robot, [:tracking, :max_speed], 45.0)
:ok
```
No rebuild, no reboot, not even a pause. Any component that referenced the parameter with `param([...])` in its declaration gets the new value through its `handle_options` callback, and the change is published so anything else that cares can subscribe.
That matters more than it looks. Tuning a control loop means trying a lot of numbers, and if each one costs you a firmware build you'll try about four. This way you'll try forty.
- [Parameters](../tutorials/07-parameters.md)
- [Parameter Bridges](../tutorials/08-parameter-bridges.md) for exposing them to the outside world
## Where to go next
- [Your First Robot](../tutorials/01-first-robot.md) builds the pan-tilt arm used in most of the examples above
- [Starting and Stopping](../tutorials/02-starting-and-stopping.md) covers the supervision tree in detail
- [Sensors and PubSub](../tutorials/03-sensors-and-pubsub.md) for the message flow
- [DSL Reference](../dsls/DSL-BB.md) for every option of every block named here
`:planar` has three freedoms: slide one way, slide the other, and turn about the plane's normal. That's a wheeled robot on a floor, which is why this diagram is drawn from above — you can't show two directions of travel from the side.
`:floating` has all six: three translations, three rotations, nothing held. Note the absence of any ground or mounting in that picture; that's the whole idea. It's what you'd use for a drone.
These two are also the only types where `axis` means something other than "the thing it moves along". For planar it's the surface normal of the plane, which is why it's required there. Floating has no distinguished direction at all, so supplying an axis is an error. The [DSL reference](../dsls/DSL-BB.md) has the details.
### Joints nothing drives
Here's the idea that catches most people out, and the one place on this page where a pan-tilt arm can't illustrate the point — so this example is from a two-wheeled balancing robot instead.
Look at the top of its topology and the first link isn't part of the robot at all:
```elixir
link :world do
joint :ground do
type(:planar)
link :ground_contact do
joint :lean do
type(:revolute)
link :base_link do
# ... the actual robot
end
end
end
end
end
```
Which seems odd until you ask what the robot is attached to. Nothing. It's free to move about the floor and free to tip over, and those are real degrees of freedom. The honest way to describe them is as joints between the world and the robot: `:ground` carries where it is on the floor, `:lean` carries how far it's tipped.
And nothing drives either of them. There's no actuator on `:ground` or `:lean`. They aren't things you command, they're things that happen to you, and sensors are how you find out how much.
So the topology describes a whole kinematic system, not just the parts you bolted together. An arm bolted to a bench genuinely does start at its base. A robot that can fall over doesn't, and pretending otherwise means doing the correction by hand forever.
### Kinematics
**Kinematics** is the business of working out where everything is. Given the chain of links and joints, plus how far each joint has currently moved, BB can tell you where any part of the machine is relative to any other.
That's more useful than it sounds. When a motion sensor mounted sideways halfway up the body reports "twelve degrees", that's twelve degrees in the *sensor's* frame. Kinematics is what turns it into a statement about the robot without you writing any trigonometry — which is the payoff for having described all those fixed joints in the first place.
Going the other way — "what joint angles put the gripper *there*?" — is **inverse kinematics**, and it's a harder problem with several competing solvers.
- [Forward Kinematics](../tutorials/04-kinematics.md) for computing positions
- [Inverse Kinematics](../tutorials/09-inverse-kinematics.md) for the reverse
## The senses: sensors and estimators
### Sensors
A **sensor** reads some hardware and publishes what it measured. It hangs off a link, because where a sensor sits changes what it sees — a sensor on a wheel and a sensor on the body are measuring different things.
```elixir
sensor :imu, {BB.Sensor.BMI323, bus: "i2c-0", address: 0x68}
```
Nothing ever asks a sensor for a reading. It publishes continuously and anything that cares subscribes. If you're used to `GenServer.call/3` being the default, this is the adjustment: the data flow is broadcast, not request-response.
### Estimators
An **estimator** turns measurements into the thing you actually wanted.
This is the one newcomers don't expect, so it's worth a concrete example. An IMU gives you two things: linear acceleration, and rotation rate. Neither of those is "which way up am I", and that's usually the question you have.
- The **accelerometer** feels gravity, so in principle it knows where down is. But it feels every other acceleration too and cannot tell them apart. A robot leaning over and a robot speeding up look identical to it.
- The **gyroscope** measures how fast you're turning. Add that up over time and you get an angle — fast, smooth, and completely untroubled by acceleration. But every small error in the measurement gets added up as well, so it drifts. A part spec'd at 1°/s of zero-rate offset is 60 degrees adrift after a minute of sitting perfectly still.
One sensor that's right on average but lies exactly when you're moving, and one that's beautifully responsive and slowly becomes fiction. The fix is to use both: follow the gyroscope moment to moment, and lean gently on the accelerometer over seconds to drag the estimate back towards where gravity says down really is.
That's all an AHRS filter is — Attitude and Heading Reference System, a grand name for "which way up am I". You don't have to write one; [`bb_estimator_ahrs`](https://hexdocs.pm/bb_estimator_ahrs) ships the standard ones.
```elixir
sensor :imu, {BB.Sensor.BMI323, bus: "i2c-0", address: 0x68} do
estimator :orientation, {BB.Estimator.Ahrs.Mahony, kp: 0.4, ki: 0.001}
end
```
The estimator nests *inside* the sensor here because "which way up" is that sensor's own answer rather than a fact about the robot. Estimators can also hang off a link, for when they're fusing several sensors into something that belongs to the robot as a whole.
- [Understanding Estimators](understanding-estimators.md) for the design, the two DSL forms, and estimator health
- [State Estimation](../tutorials/13-state-estimation.md) for writing one
## The doing: actuators and controllers
### Actuators
An **actuator** is the other half of a joint. The joint says this wheel is allowed to spin; the actuator is the thing that spins it. It takes commands and drives hardware.
```elixir
joint :pan_joint do
type(:revolute)
actuator :pan_servo, {MyRobot.Servo, channel: 0}
end
```
Which means a joint with no actuator is still a perfectly good joint. It just moves because the world moved it, rather than because you asked — exactly the `:ground` and `:lean` joints from earlier.
### Controllers
A **controller** subscribes to whatever it needs, does its sums, and tells actuators what to do. Long-lived, supervised, and running for as long as the robot does. This is where your loop lives.
```elixir
controller :tracker, {MyRobot.FaceTracker, rate: 50}
```
A controller that needs to run periodically embeds a `BB.Loop` in its state, which handles the non-drifting tick, the measured time delta and the "this loop isn't keeping up" reporting. It's a struct rather than a behaviour or a process, so your controller stays an ordinary controller and threads the loop through its own callbacks. A loop can also be clocked externally, which is usually the better choice for a feedback loop — the sensor feeding it already has a cadence, and borrowing that beats running an independent timer alongside it.
The classic controller is a feedback loop: you know what you want, you can measure what you've got, and the difference between them is the **error**. What you do with that error is the interesting part, and the standard answer is PID — proportional, integral, derivative.
- [Understanding PID](https://hexdocs.pm/bb_pid_controller/understanding-pid.html) explains the three terms from scratch, and how to tell by watching a robot which one needs changing
- [Reactive Controllers](reactive-controllers.md) for the built-in threshold and pattern-match controllers
- [Writing an Actuator](../tutorials/12-writing-an-actuator.md) for the actuator side
## The rules: commands, states and parameters
### Commands
A **command** is something you're allowed to ask the robot to do. Unlike a controller it's short-lived: it has a goal, it runs, it produces a result, and it finishes.
```elixir
command :home do
handler(MyRobot.Command.Home)
allowed_states([:idle])
end
```
### States
A **state** is where the robot is in its own life, and which commands are legal there. Every robot starts with `:disarmed` and `:idle`; you add whatever else your machine needs.
```elixir
state(:tracking, doc: "Following a target")
```
This is the safety system, and the reason it's worth declaring rather than checking by hand: a robot that has fallen over shouldn't accept "drive forwards", and a state machine lets you say so once instead of guarding every call site.
- [Commands and State Machine](../tutorials/05-commands.md)
- [Understanding Safety](understanding-safety.md)
### Parameters
A **parameter** is a configuration value with a type, a default, and optionally bounds. Groups nest them, and the nesting gives each one a path.
```elixir
parameters do
group :tracking do
param(:max_speed, type: :float, default: 30.0, min: 0.0, max: 90.0)
end
end
```
Every write is checked, so nothing can set that to `"banana"` or to minus four hundred.
Declaring it is half the story. The other half is that you can change it on a running robot:
```elixir
iex> BB.Parameter.get!(MyRobot.Robot, [:tracking, :max_speed])
30.0
iex> BB.Parameter.set(MyRobot.Robot, [:tracking, :max_speed], 45.0)
:ok
```
No rebuild, no reboot, not even a pause. Any component that referenced the parameter with `param([...])` in its declaration gets the new value through its `handle_options` callback, and the change is published so anything else that cares can subscribe.
That matters more than it looks. Tuning a control loop means trying a lot of numbers, and if each one costs you a firmware build you'll try about four. This way you'll try forty.
- [Parameters](../tutorials/07-parameters.md)
- [Parameter Bridges](../tutorials/08-parameter-bridges.md) for exposing them to the outside world
## Where to go next
- [Your First Robot](../tutorials/01-first-robot.md) builds the pan-tilt arm used in most of the examples above
- [Starting and Stopping](../tutorials/02-starting-and-stopping.md) covers the supervision tree in detail
- [Sensors and PubSub](../tutorials/03-sensors-and-pubsub.md) for the message flow
- [DSL Reference](../dsls/DSL-BB.md) for every option of every block named here